Recommended Mods
DupI3.RecommendedMods History
Hide minor edits - Show changes to markup
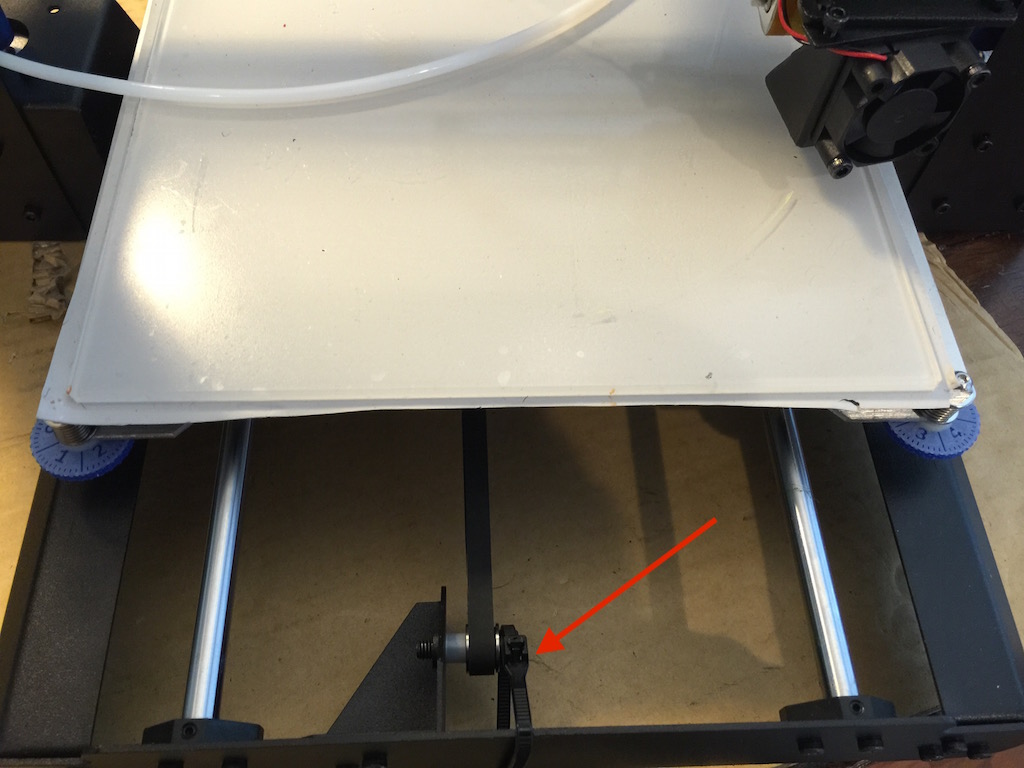
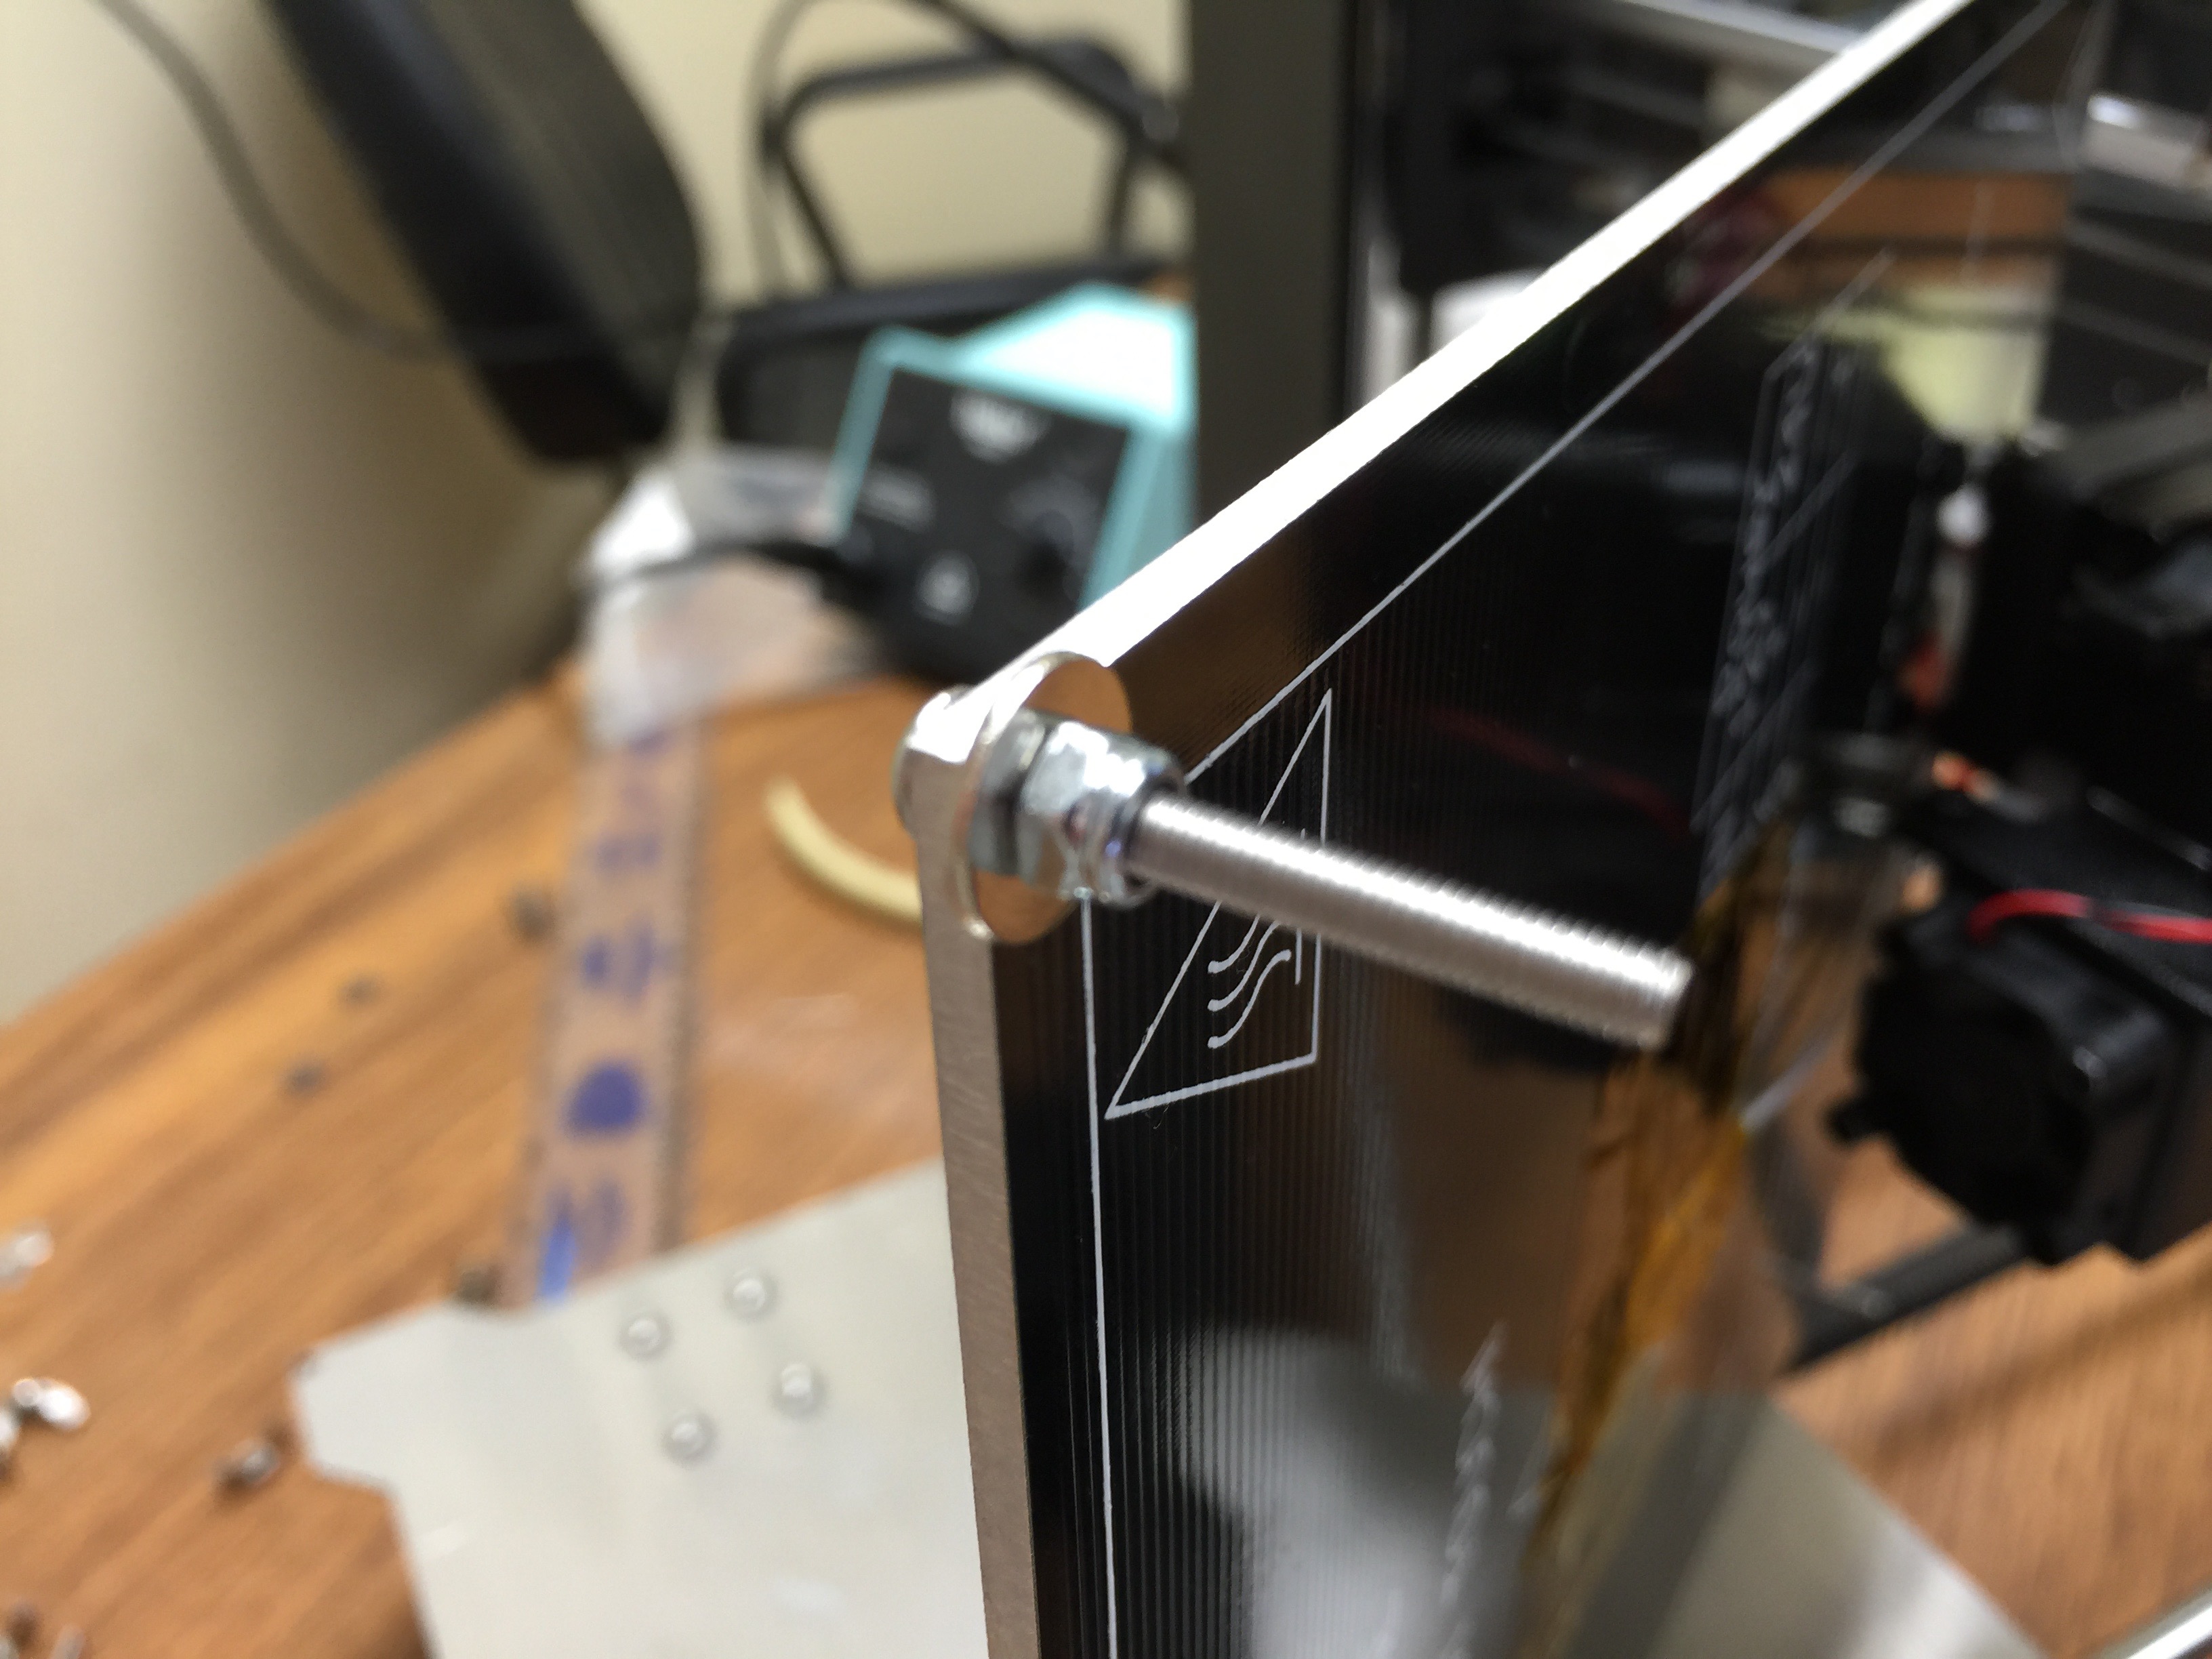
- Adding the Y axis idler brace or zip tie. Seriously, makes another huge difference but must be done after the one above to fix the bed. Y Idler Zip Tie Photo
- Adding the Y axis idler brace or zip tie. Seriously, makes another huge difference but must be done after the one above to fix the bed. Ensure that you do not have the Ziptie installed with the locking tab up as it will interfere with the Y axis moving fully forward. Y Idler Zip Tie Photo
Check which version of printer you have. All of the new printers should have most of these mods already done to them. See if yours has the vertical cable chain and if it does you can jump to the Extra Mods if you want to do anything (but do the heater crimp fix first if that has not been done).
Check which version of printer you have. All of the new printers should have most of these mods already done to them. See if yours has the vertical cable chain and if it does you can skip items 1-3 on the list below if you want to do anything (but do the heater crimp fix first if that has not been done).
I honestly consider everything else after that improvements but not first things that need addressed. Feel free to comment and add.
Again, really, I want to say the machine is quite capable out of the box. While more cooling is ideal, it's not required. The only real concern is that gcode controlled fan out of the box. I can easily see situations where a user can preheat the hotend- have it sit there for a LONG time and not have the fan cooling. It may or may not damage the plastic parts, I'm not willing to find out. It certainly could cause one heck of a jam that is hard to fix later. And while yes, I raised issue about the fan being 24V, it's not that it does not work. In fact, you probably might not "have to" change it, it's just a good idea- a very good idea. It's far more important the fan is always on rather than the chance we could have the extrude being heated with it off by accident or user mistake.
I honestly consider everything else after that improvements but not first thi
Check which version of printer you have. All of the new printers should have most of these mods already done to them. See if yours has the vertical cable chain and if it does you can jump to the Extra Mods if you want to do anything (but do the heater crimp fix first if that has not been done).
Recommended Extra Screws
This is my list so far based on my Dup i3 all in mm:
Recommended Extra Screws:
| ! DIA | LENGTH | HEAD | LOCATION | HEX |
|---|
| DIA | LENGTH | HEAD | LOCATION | HEX |
|---|
Recommended Extra Screws
This is my list so far based on my Dup i3 all in mm:
| ! DIA | LENGTH | HEAD | LOCATION | HEX |
|---|---|---|---|---|
| M4 | 16 | BUTTON | X-AXIS BELT | 2.5 |
| M3 | 5 | SOCKET HEAD | FRAME | 2.5 |
| M3 | 12 | SOCKET HEAD | 30MM NOZZLE FAN | 2.5 |
| M3 | 5 | SOCKET HEAD | 30MM NOZZLE FAN HOLDER | 2.5 |
| M3 | 40 | SOCKET HEAD | 40MM COLD END FAN | 2.5 |
| M4 | 9.5 | BUTTON | X-AXIS BEARING CARRIER | 2.5 |
| M3 | 3 | SET SCREW | X-AXIS RODS | 1.5 |
| M3 | 3 | SET SCREW | Y-AXIS RODS | 1.5 |
| M3 | 10 | SOCKET HEAD | Z-AXIS COUPLER | 2.5 |
- While adding the M3 nuts from above I would mention that Thumb Screws instead of the Wing Nuts make a big difference when you are trying to level the bed. Here is one that I like and modified to fit the Di3 (had to change the radius and move the nut to the bottom). We also printed in two colors just because it looked cool.
- While adding the M3 nuts from above I would mention that Thumb Screws instead of the Wing Nuts make a big difference when you are trying to level the bed. Here is one that I like and modified to fit the Di3 (had to change the radius and move the nut to the bottom). We also printed in two colors just because it looked cool. STL File on Thingiverse
- While adding the M3 nuts from above I would mention that Thumb Screws instead of the Wing Nuts make a big difference when you are trying to level the bed. Here is one that I like and modified to fit the Di3 (had to change the radius and move the nut to the bottom). We also printed in two colors just because it looked cool. /

- While adding the M3 nuts from above I would mention that Thumb Screws instead of the Wing Nuts make a big difference when you are trying to level the bed. Here is one that I like and modified to fit the Di3 (had to change the radius and move the nut to the bottom). We also printed in two colors just because it looked cool.

- While adding the M3 nuts from above I would mention that Thumb Screws instead of the Wing Nuts make a big difference when you are trying to level the bed. Here is one that I like and modified to fit the Di3 (had to change the radius and move the nut to the bottom). We also printed in two colors just because it looked cool.
- While adding the M3 nuts from above I would mention that Thumb Screws instead of the Wing Nuts make a big difference when you are trying to level the bed. Here is one that I like and modified to fit the Di3 (had to change the radius and move the nut to the bottom). We also printed in two colors just because it looked cool. /
- While adding the M3 nuts from above I would mention that Thumb Screws instead of the Wing Nuts make a big difference when you are trying to level the bed. Here is one that I like and modified to fit the Di3 (had to change the radius and move the nut to the bottom). We also printed in two colors just because it looked cool.
- Glass bed. Printing on glass is so much easier than using tape on the aluminum tape (even better with Aquanet hairspray). Here is a good source of glass for this size bed: Borosilicate Glass 213x200mm
- Z axis couplers or dampeners your choice. Either works and is reasonably cheap. Couplers might be easier to find.
- Z axis couplers or dampeners your choice. Either works and is reasonably cheap. Couplers might be easier to find. Dampeners on Ebay
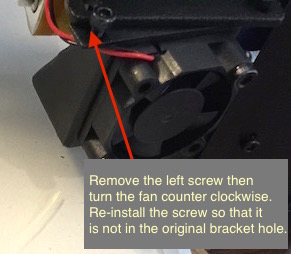
- Move the 40mm cooling fan cooling the extruder from being gcode controlled via the fan output on the mainboard- to directly connected to the PSU for constant on. While in my head this is a simply mod, we need a video of someone doing this to a virgin machine. Any volunteers?
- Move the 40mm cooling fan cooling the extruder from being gcode controlled via the fan output on the mainboard- to directly connected to the PSU for constant on. While in my head this is a simply mod, we need a video of someone doing this to a virgin machine. Any volunteers? PDF of Extruder Fan Modification Thanks Keilinger
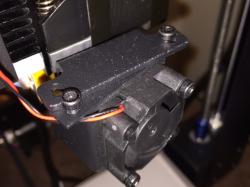
- Angling the cooling fan. Yet another easy mod and no parts required Cooling Fan Mod Photo with Instructions - Video

- Angling the cooling fan. Yet another easy mod and no parts required Cooling Fan Mod Photo with Instructions / Video
- Angling the cooling fan. Yet another easy mod and no parts required Cooling Fan Mod Photo with Instructions Video >>?
- Angling the cooling fan. Yet another easy mod and no parts required Cooling Fan Mod Photo with Instructions - Video
- Angling the cooling fan. Yet another easy mod and no parts required Cooling Fan Mod Photo with Instructions >>?
- Angling the cooling fan. Yet another easy mod and no parts required Cooling Fan Mod Photo with Instructions Video >>?
- Angling the cooling fan. Yet another easy mod and no parts required Cooling Fan Mod Photo
- Angling the cooling fan. Yet another easy mod and no parts required Cooling Fan Mod Photo with Instructions >>?
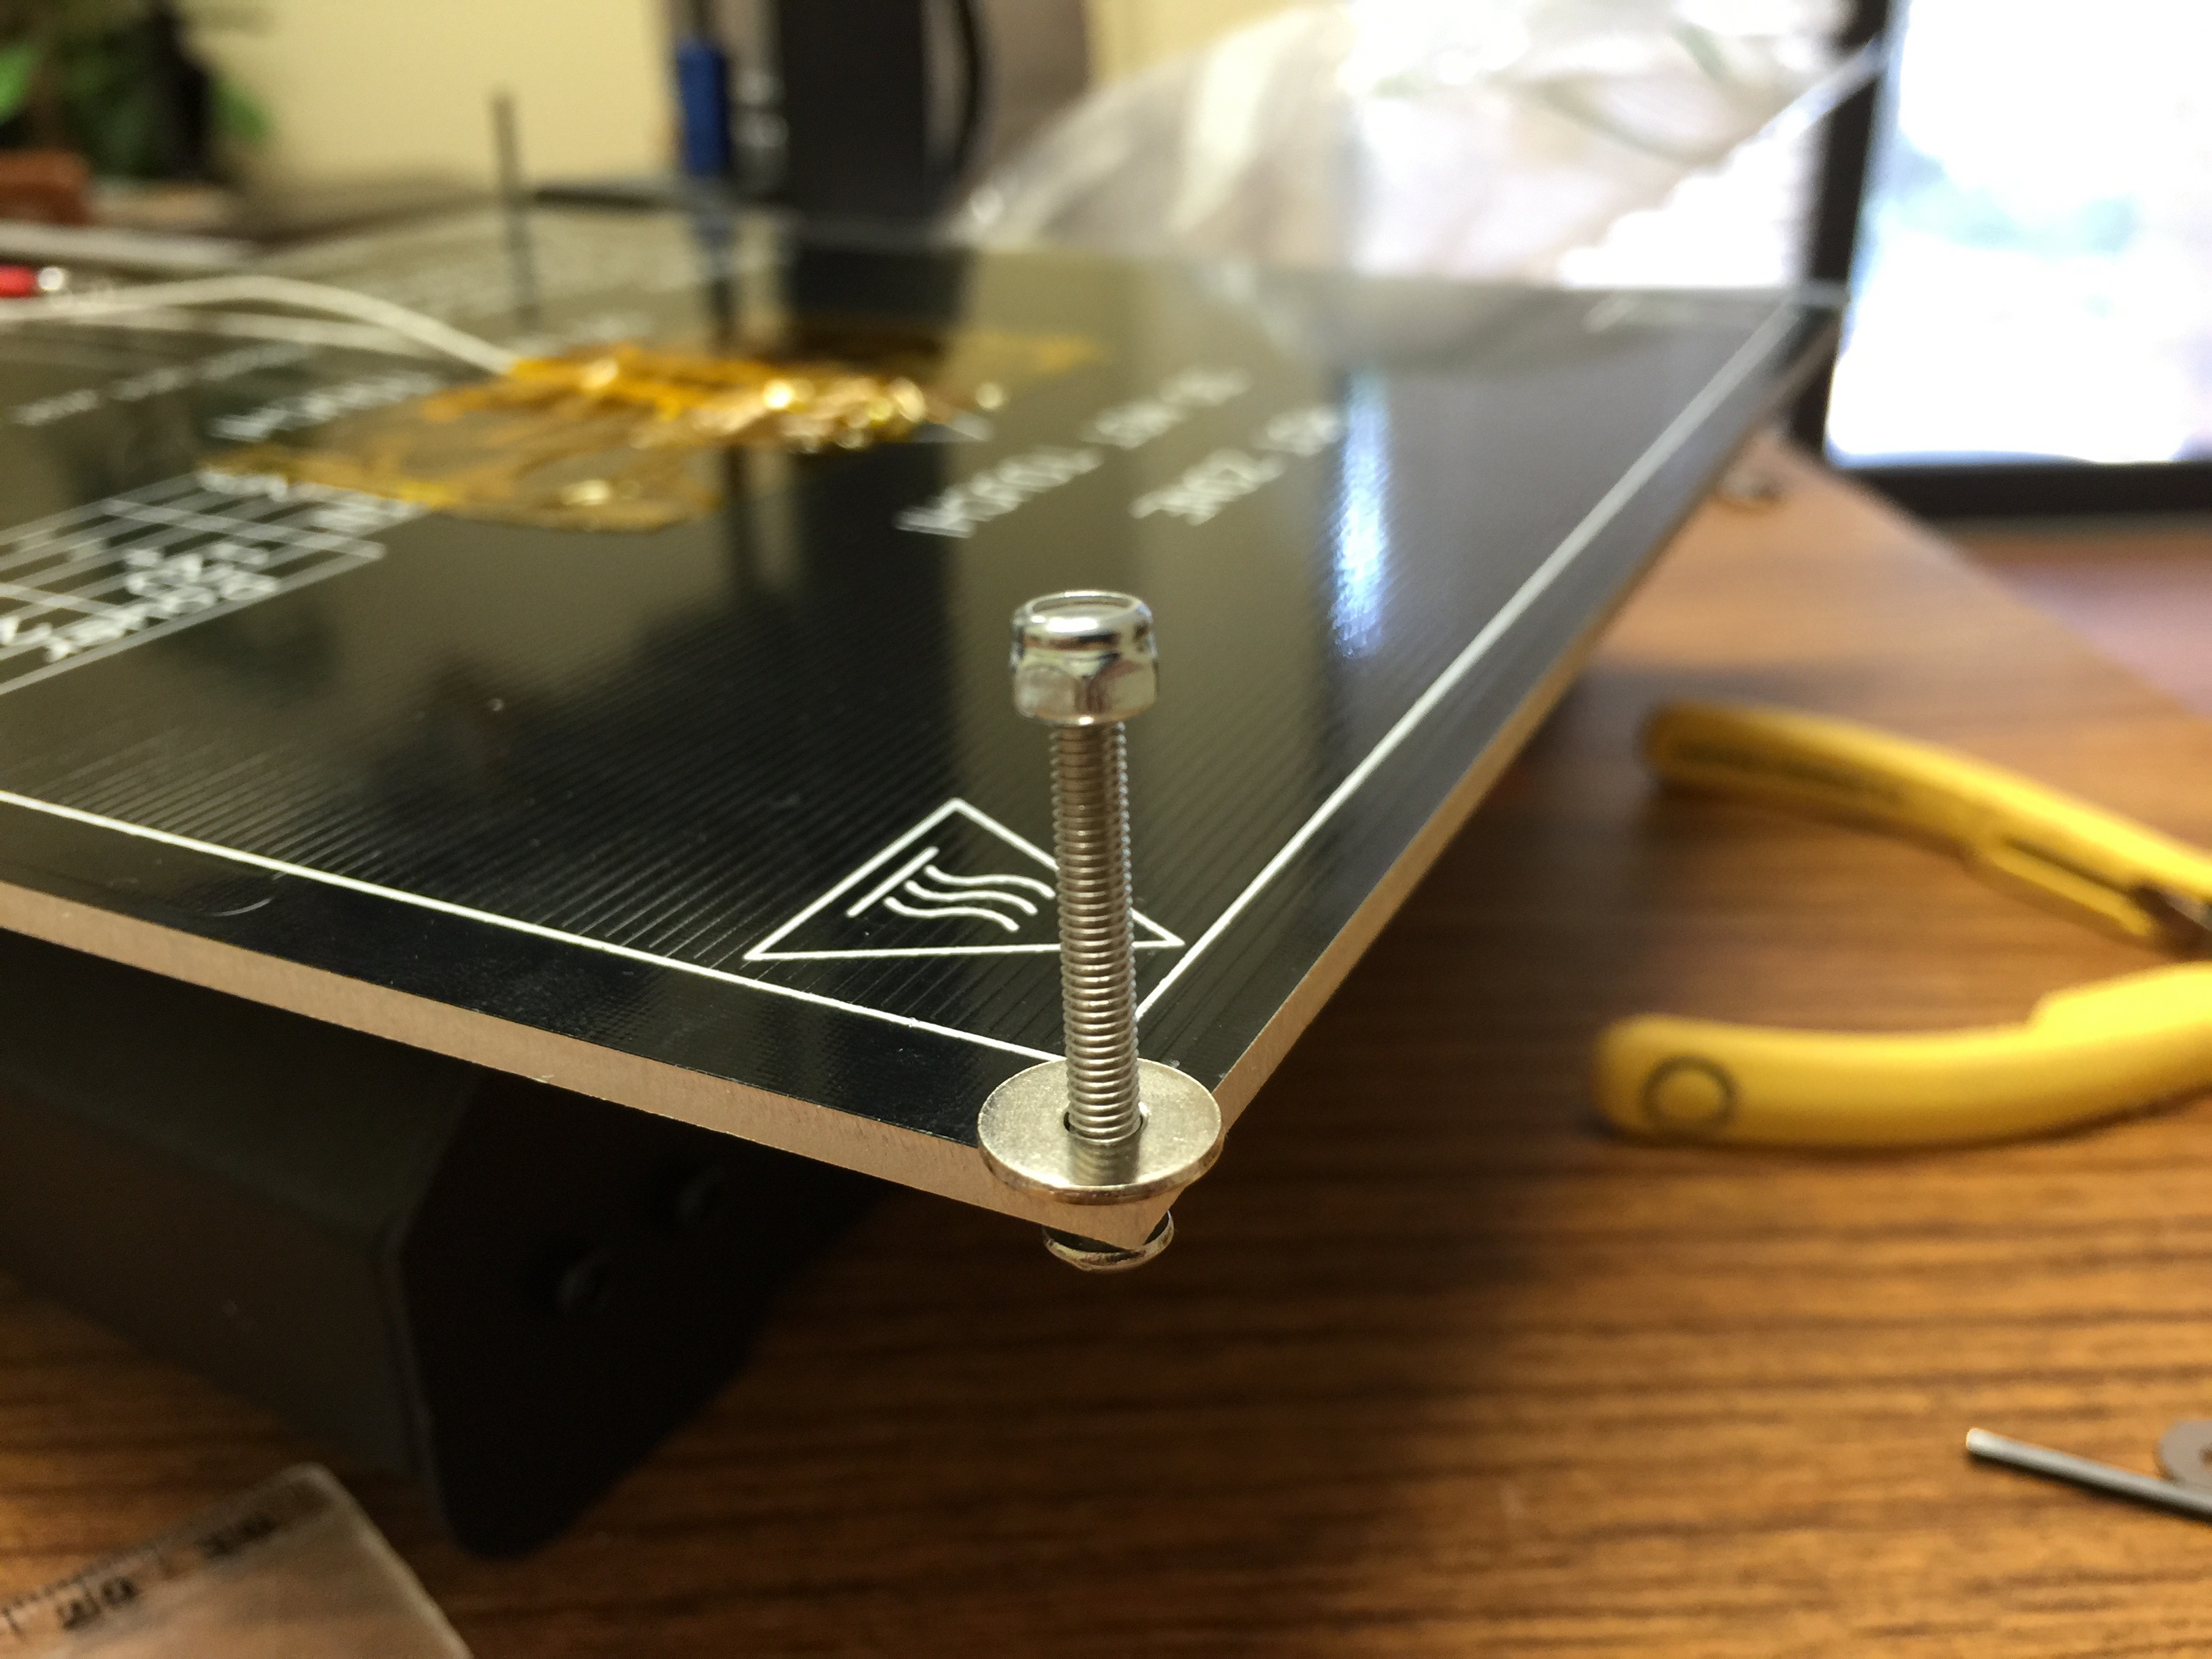
- Adding M3 nuts to the bottom side of the heated bed plate to lock the vertical leveling screws to the plate so rocking and motion between the Y lower plate and the build plate is eliminated. All it requires is 4 M3 nuts. Easy mod but makes a HUGE difference. Leveling Screw Nut Photo 1 Leveling Screw Nut Photo 2 Video
- Adding M3 nuts to the bottom side of the heated bed plate to lock the vertical leveling screws to the plate so rocking and motion between the Y lower plate and the build plate is eliminated. All it requires is 4 M3 nuts. Easy mod but makes a HUGE difference. Leveling Screw Nut Photo 1 / Leveling Screw Nut Photo 2 / Video
- Adding M3 nuts to the bottom side of the heated bed plate to lock the vertical leveling screws to the plate so rocking and motion between the Y lower plate and the build plate is eliminated. All it requires is 4 M3 nuts. Easy mod but makes a HUGE difference. Leveling Screw Nut Photo 1 Leveling Screw Nut Photo 2
- Adding M3 nuts to the bottom side of the heated bed plate to lock the vertical leveling screws to the plate so rocking and motion between the Y lower plate and the build plate is eliminated. All it requires is 4 M3 nuts. Easy mod but makes a HUGE difference. Leveling Screw Nut Photo 1 Leveling Screw Nut Photo 2 Video
It's far more important the fan is always on rather than the chance we could have the extrude being heated with it off by accident or user mistake.
It's far more important the fan is always on rather than the chance we could have the extrude being heated with it off by accident or user mistake.
- Adding M3 nuts to the bottom side of the heated bed plate to lock the vertical leveling screws to the plate so rocking and motion between the Y lower plate and the build plate is eliminated. All it requires is 4 M3 nuts. Easy mod but makes a HUGE difference. Leveling Screw Nut Photo 1 Δ Leveling Screw Nut Photo 2 Δ
- Adding M3 nuts to the bottom side of the heated bed plate to lock the vertical leveling screws to the plate so rocking and motion between the Y lower plate and the build plate is eliminated. All it requires is 4 M3 nuts. Easy mod but makes a HUGE difference. Leveling Screw Nut Photo 1 Leveling Screw Nut Photo 2
- Move the 40mm cooling fan cooling the extruder from being gcode controlled via the fan output on the mainboard- to directly connected to the PSU for constant on. While in my head this is a simply mod, we need a video of someone doing this to a virgin machine. Any volunteers?
- Z axis couplers or dampeners your choice. Either works and is reasonably cheap. Couplers might be easier to find.
- I know you guys are thinking another fan mod here. Ok, I guess I'll say switch the extruder cooling fan to a 12V model and then use that 24V 40mm fan (because it still works fine, is just not 100% as fast as it could be) to cooling the electronics
- Some folks are having issue missing (as in not physically contacting and tripping) the Z axis limit switch. I have not personally seen this. I think it may indicate a complete X and Z axis gantry alignment needs done or the frame is tweaked if you have this problem. That said, simple mod to space the switch out from the frame to ensure it is always tripped as the axis homes.
- 1 Adding M3 nuts to the bottom side of the heated bed plate to lock the vertical leveling screws to the plate so rocking and motion between the Y lower plate and the build plate is eliminated. All it requires is 4 M3 nuts. Easy mod but makes a HUGE difference.
- 2 adding the Y axis idler brace or zip tie. Seriously, makes another huge difference but must be done after the one above to fix the bed. Y Idler Zip Tie Photo
- 3 Angling the cooling fan. Yet another easy mod and no parts required Cooling Fan Mod Photo
- Adding M3 nuts to the bottom side of the heated bed plate to lock the vertical leveling screws to the plate so rocking and motion between the Y lower plate and the build plate is eliminated. All it requires is 4 M3 nuts. Easy mod but makes a HUGE difference. Leveling Screw Nut Photo 1 Δ Leveling Screw Nut Photo 2 Δ
- Adding the Y axis idler brace or zip tie. Seriously, makes another huge difference but must be done after the one above to fix the bed. Y Idler Zip Tie Photo
- Angling the cooling fan. Yet another easy mod and no parts required Cooling Fan Mod Photo
It's far more important the fan is always on rather than the chance we could have the extrude being heated with it off by accident or user mistake.
It's far more important the fan is always on rather than the chance we could have the extrude being heated with it off by accident or user mistake.
- 3 Angling the cooling fan. Yet another easy mod and no parts required
- 3 Angling the cooling fan. Yet another easy mod and no parts required Cooling Fan Mod Photo
These are the Recommended Modifications for the Duplicator I3 Printer
These modifications are broken down by priority (which ones should be made first).
Reliability out of the box:
- Move the 40mm cooling fan cooling the extruder from being gcode controlled via the fan output on the mainboard- to directly connected to the PSU for constant on. While in my head this is a simply mod, we need a video of someone doing this to a virgin machine. Any volunteers?
- Z axis couplers or dampeners your choice. Either works and is reasonably cheap. Couplers might be easier to find.
- I know you guys are thinking another fan mod here. Ok, I guess I'll say switch the extruder cooling fan to a 12V model and then use that 24V 40mm fan (because it still works fine, is just not 100% as fast as it could be) to cooling the electronics
- Some folks are having issue missing (as in not physically contacting and tripping) the Z axis limit switch. I have not personally seen this. I think it may indicate a complete X and Z axis gantry alignment needs done or the frame is tweaked if you have this problem. That said, simple mod to space the switch out from the frame to ensure it is always tripped as the axis homes.
This is another print QUALITY category:
- 1 Adding M3 nuts to the bottom side of the heated bed plate to lock the vertical leveling screws to the plate so rocking and motion between the Y lower plate and the build plate is eliminated. All it requires is 4 M3 nuts. Easy mod but makes a HUGE difference.
- 2 adding the Y axis idler brace or zip tie. Seriously, makes another huge difference but must be done after the one above to fix the bed. Y Idler Zip Tie Photo
- 3 Angling the cooling fan. Yet another easy mod and no parts required
I honestly consider everything else after that improvements but not first things that need addressed. Feel free to comment and add.
Again, really, I want to say the machine is quite capable out of the box. While more cooling is ideal, it's not required. The only real concern is that gcode controlled fan out of the box. I can easily see situations where a user can preheat the hotend- have it sit there for a LONG time and not have the fan cooling. It may or may not damage the plastic parts, I'm not willing to find out. It certainly could cause one heck of a jam that is hard to fix later. And while yes, I raised issue about the fan being 24V, it's not that it does not work. In fact, you probably might not "have to" change it, it's just a good idea- a very good idea. It's far more important the fan is always on rather than the chance we could have the extrude being heated with it off by accident or user mistake.