Tips
Glass Clips vs Ginopads (Silicone)
On the topic of attaching glass:
On other printers, the problem in the past was the heater for the HBP was fiberglass circuit board and then an aluminum plate on top that had many screws that clamped the 2 plates together. Due to differing thermal expansion rates, the aluminum would try to expand but was constrained by the fiberglass that would then cause arching or or crowning of the aluminum plate when heated. Many folks complained.
This printer is different in that the heater is an etched circuit attached to the aluminum plate. This is a more advanced system and is quite impressive. That said, it's still hard for any aluminum plate to be heated on one side, and then not have differing internal thermal expansion and warp and distort. I'm not saying there is a problem, I think is is just generalizing what can happen.
As such, clipping glass to an aluminum plate generally, does distort the glass slightly. I know this is hard to imagine but glass DOES BEND and flex. When trying to achieve sub mm precision across 200mm in X and Y, it can make a difference. So, using silicone square soft conformal pads lets the glass "float" and not be impacted by warping forces of the aluminum. It is strong enough the pad cannot slide in X or Y and thus cause a positioning error, but is generally sticky enough that the plate is semi difficult to remove meaning it shouldn't accidentally fall off during handling and transit.
Again, the general problems with clips are: They rattle and buzz if the handles are not removed after install They can chip and crach the edge of the glass weakening it They are something for the nozzle to ram into Other things can catch on the handles sticking out if left on It's cheap and awkward looking to be honest.
Slicers:
Parts not Sticking to the Bed
ABS will not reliably stick to only a masking tape surface- and adding hairspray is no guarantee either. ABS is harder to print with than PLA because it doesn't like to stick, requires extra attention to bed prep, really likes to be printed in a heated chamber surrounding the print with what you would consider rather hot air by comparison.
ABS should use 230C extruder and 100C heated bed temp but printing on the following bed surfaces: Kapton aka polymide tape Glass with a proven hairspray (not just any brand works) Glass with ABS slurry (ABS scraps melted in a glass jar using pure acetone from the hardware store, painted into a layer on the glass and let dry solid)
Given the i3 came with masking tape and no glass, it was NEVER intended for first prints to be with ABS. Can you print ABS on the i3- Absolutely Should it be your first prints- NO, and I'll stand behind that answer 100%
It's simply trying to do something very hard (print ABS) using less than ideal conditions and then wondering why it doesn't work well.
Conversely, PLA is very easy PLA uses 195C to 200C and 50C bed or optionally no heated bed It sticks easily to painters tape masking tape Glass with hairspray (best heated to 50C) And many other options like Kapton tape (also heated to 50C)
Filament Loading and Unloading
Unloading:
- I find it best to unload the filament by heating the extruder up to temperature then after the temperature has been reached press down on the filament tension arm and then push the filament down (feed the filament by hand) until at least 1/2" has been push through the extruder then immediately pull the filament out. Unloading the filament this way helps remelt the end and get rid of the bulge that may have formed which can get caught between the pinch wheel and bearing as you pull the filament out. If this happens and the filament is hot enough the end may get broken off and left behind causing a blockage that may require taking the fan off the extruder to clear.

More explanations from Jetguy:
Since you asked about unloading filament, here's the answer:
PLA generally tends to get brittle overnight when it is curved on the spool and then straightened in the guide tube or path in the extruder. It might crack in the end right above or in the extruder the next day. ALWAYS extrude before unloading. In other words, on the i3, preheat, wait for it to reach extruder temp, I manually push down on the filament into the extruder and extrude at least 10mm of fresh filament, then press on the release lever and rapidly pulls up the filament while holding the release lever. ALWAYS cut off the melted tip before inserting the filament the next day.
Again, I cannot stress enough, ALWAYS, as a rule, a habit, even as a metal tick, extrude BEFORE removing or unloading filament. Do not power remove filament using the menu. Remember, you have MOLTEN plastic on the end of the filament. If you run that up back through the drive gears with the ilder bearing pressing against it, it will deform and might snap off inside the extruder between the drive gear and the lower plastic guide. Failure to follow this can lead to a major jam that requires taking apart the entire drive feed system.
The whole reason again I push down on the lever and manually extrude and then manually pull back, I can feel what the filament is doing. If when pulling back I feel resistance, i know i need to extrude MORE fresh filament before pulling back out. If you fail to do this, you likely will pull up molten plastic that always gets caught in the worst possible place in the feed mechanism and then you are having an even worse day.
Loading:
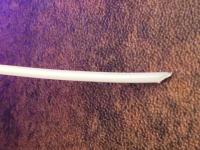
- Cut the end of the filament off at a sharp angle so the tip is pointed

- Carefully straighten out at least the last inch of the filament out (PLA can be brittle).
- Make sure the extruder has been preheated and up to temperature for the filament you are using (ABS vs PLA / PET)
- Push down on the extruder tensioner arm and feed the filament in. You should feel when it goes into the bottom hole and starts to have a little resistance. Feed just a little more by hand so you are sure the filament has been inserted into the hole correctly. You should see a little filament come out of the extruder nozzle.
Aligning the X Rods
Google Groups Thread on subject
The i3, and any printer like it from a frame design perspective MUST and I mean MUST have the X axis gantry locked in as one single moving piece. By this, I mean the metal box ends and the rods form a mini "frame". That frame then in turn rids up and down Z. Due to shipping damage and what I see as simply the factory not cranking these down (my lower X rod was completely disconnected at one side) when I got mine.
Just like the Y axis smooth rods, there are these aluminum triangular blocks with setscrews that clamp to the smooth metal shaft. The problem here is understanding alignment and how everything interacts as a complete motion frame. As I said before, the X axis MUST act as a unit or single piece sub frame. This is because the motor is at one end, the idler at the other and belt tension pulling the 2 ends together.
The complication is the distance between the 2 X axis ends is also related to the location of the smooth rods. So you have to align the X axis blocks in place on the Z rods, TIGHT so that belt tension or other forces cannot pull the ends together or cause other problems. So, the proper procedure is to raise the Z axis until maxed out and square at the upper top limit. The X belt must be completely not under any tension (remove one of the screws from the X carriage used as a "post" that the belt loops around. Now loosen all 4 setscrews to the X axis smooth rod end clamp blocks. ALL 4 must be loose. Ideally, you remove the Z screws and motors completely so you can slide the entire X assembly up and down the smooth rods of Z to test and ensure the frame is square and true. Now again, move all the way up and then LOCK as tight as possible without stripping the tiny setscrews the X axis rods with NO belt tension. Now the system should be square, true and rigid. Now install the X axis belt under tension by replacing the M4 screw "post" that forms the belt connection to the moving X carriage. Now, again, test Z axis motion ensuring the entire X moves freely up and down as a unit. Install the Z motors and screws. Now relevel and sync the Z motors and general bed leveling adjustment.